Secure Data Management and Access Control in PrivateAI
1. Storage & Encryption system architecture
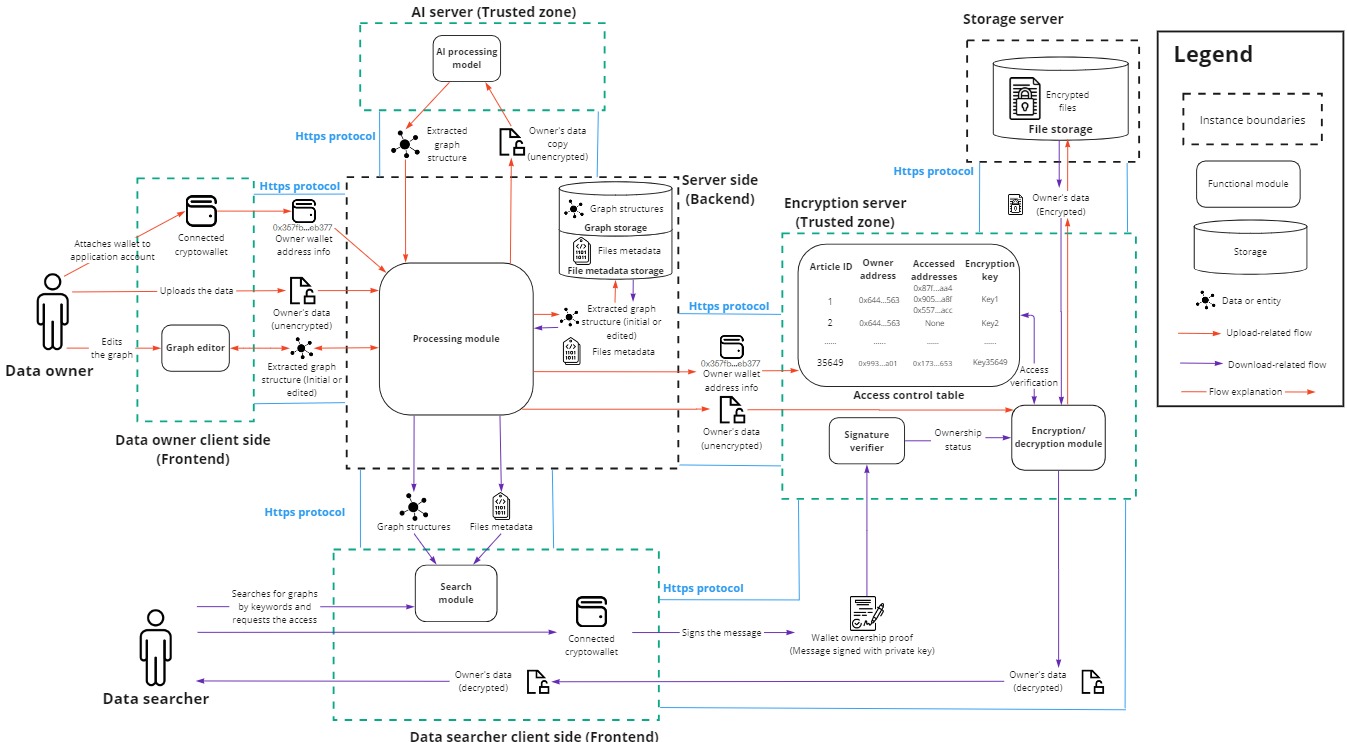
The diagram above illustrates the architecture of the PrivateAI system, which includes the following components:
- Application Client Site (Frontend):
- Interface for user interaction with the system.
- Application Server Side (Backend):
- Handles server-side processing operations within the PrivateAI system.
- AI Server (Trusted Zone):
- A dedicated server with a deployed AI model for extracting knowledge graphs.
- Currently considered a trusted zone where the AI model processes unencrypted data.
- Encryption Server (Trusted Zone):
- A dedicated server responsible for encrypting and decrypting users’ files.
- Maintains access verifications to ensure secure data handling.
- Storage Server (Untrusted Zone):
- A server for storing users’ articles in encrypted form.
- Simulates the future system where each storage node will be managed by a third-party server, emphasizing the importance of encryption for data security.
2. Encryption flow
Upload process
1. Initial Upload:
- When the data owner uploads a file on the client side, the file is transmitted via an HTTPS connection to the application backend in its original, unencrypted form.
2. Backend Processing:
- File Copy: A copy of the original file is created within the backend server.
3. Original File Handling:
- The original file is sent to the encryption server along with the owner's wallet address, which is stored and used as one of the article's identifiers.
- An encryption key is generated for this particular article, ensuring each article has a unique key.
- All encryption keys are securely stored on the encryption server, with no external access allowed.
- The file is encrypted with the generated key and then sent to the storage server, where it is stored in encrypted form.
4. File Copy Handling:
- The file copy is transmitted to the AI server for the knowledge graph extraction process.
- Once the graph extraction is completed, the file copy is deleted from the AI server.
- The extracted knowledge graph is returned to the backend server, where it is saved along with the file metadata to facilitate file searches.
5. User Interaction:
- The extracted knowledge graph is displayed to the data owner in the application interface, allowing for review and edits.
- After any edits are made, the updated graph is saved anew on the backend server.
Request Process in PrivateAI System
1. Searching for Files:
- The data searcher visits the platform and searches for files by entering keywords.
- They can examine the file structure by viewing the saved knowledge graph and request access to the file.
2. Access Request:
- Upon the searcher's request, the data owner grants access to the stored file.
- The wallet address of the data searcher is added to the access entity list on the encryption server.
3. Verification:
- The data searcher signs a special message in their MetaMask wallet.
- This signed message is sent to the encryption server for verification.
- The signed message serves as proof that the searcher indeed owns the specified wallet address.
4. Decryption and Delivery:
- If the message is approved, decryption is permitted.
- The file is downloaded from the storage server, decrypted using its unique encryption key by the encryption backend, and sent to the data searcher in decrypted form via HTTPS.
Key Takeaways
- Encryption Management:
- The entire encryption process is managed within the encryption server.
- Access Control:
- Access permissions to files are stored in a dedicated access control table.
- Access is tracked using the wallet addresses of requesters.
- Verification Requirement:
- Possessing access permission alone is insufficient; users must verify ownership of the specified wallet address by signing a special message with their private key.
- Open File Access:
- Open files can be downloaded by anyone, but a signed message is still required to track access.
- AI Assistant Access:
- The AI assistant has default access to all stored files to ensure it can correctly function and analyze the content of these files.
3. User flow
The sequence of user actions on the PrivateAI platform is as follows:
- File Owner Connects Wallet:
- The file owner connects their wallet to the platform, enabling the ability to upload files.
- File Owner Uploads File:
- The file owner uploads a file to the platform.
- Data Searcher Requests Access:
- A data searcher requests access to the file.
- File Owner Receives Notification:
- The file owner receives a notification about the new access request.
- File Owner Grants Access:
- The file owner grants access to the requested file.
- File Owner Identity Verification:
- The file owner is prompted to sign a message in their MetaMask wallet to prove their identity.
- Access Granted Notification:
- The data searcher is notified that access rights have been granted.
- Data Searcher Initiates Download:
- The data searcher initiates the download of the file.
- Data Searcher Identity Verification:
- The data searcher is prompted to sign a message in their MetaMask wallet to prove their identity.
This user flow is illustrated in the screenshots from the PrivateAI platform.
1. Profile page (File owner)
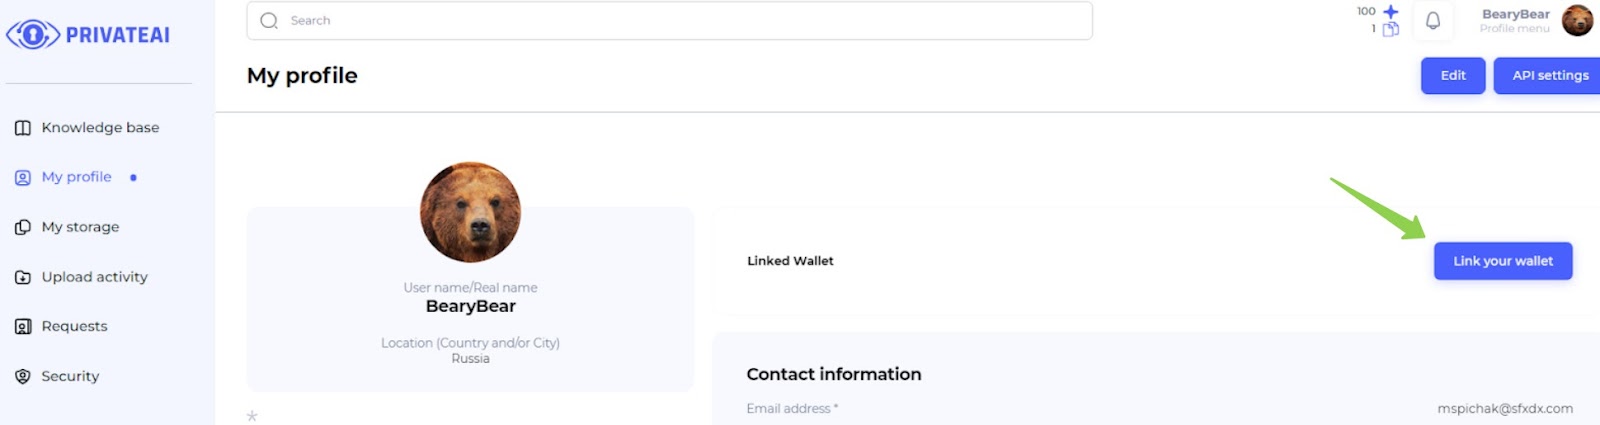
To connect the wallet, follow these steps:
- Navigate to Profile Page:
- Go to the profile page on the platform.
- Click "Link your wallet" Button:
- Click on the “Link your wallet” button as shown in the illustration.
2. Connect the wallet (File owner)
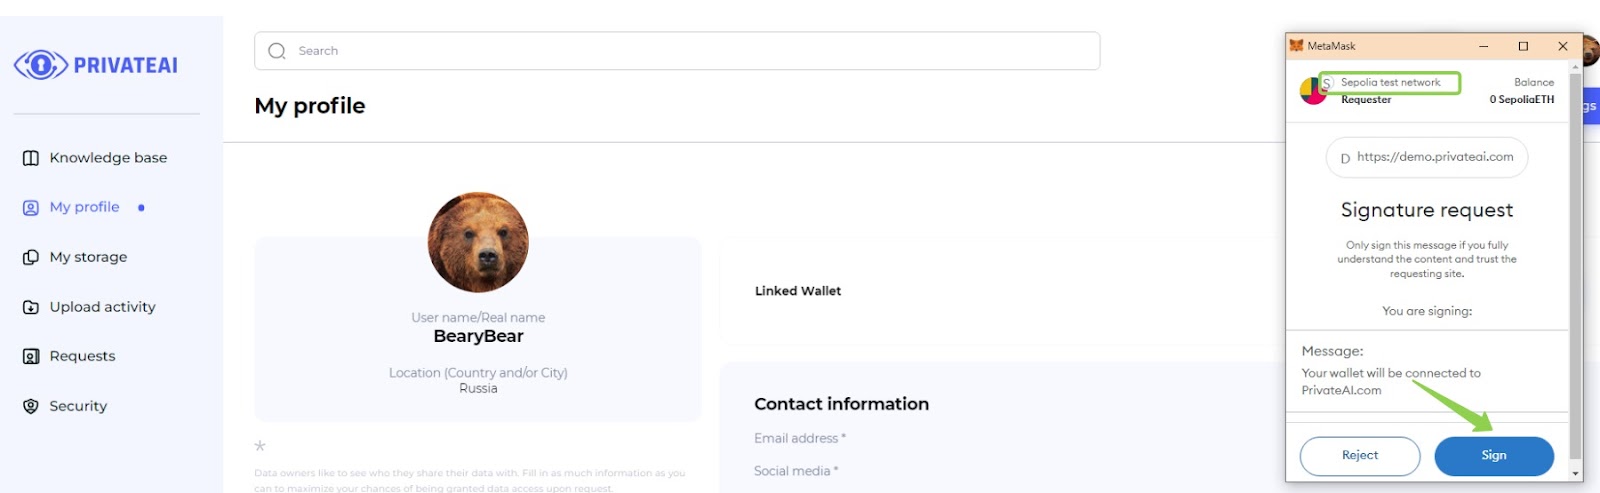
- Sign the Request:
- After clicking "Link your wallet," a request will appear in the MetaMask wallet extension.
- Sign the request in the MetaMask wallet extension to proceed.
- Select the Sepolia Test Network:
- Ensure that the network selected in the MetaMask extension is the Sepolia test network.
- If the Sepolia test network is not selected, the wallet will not be connected.
3. Upload the file (File owner)
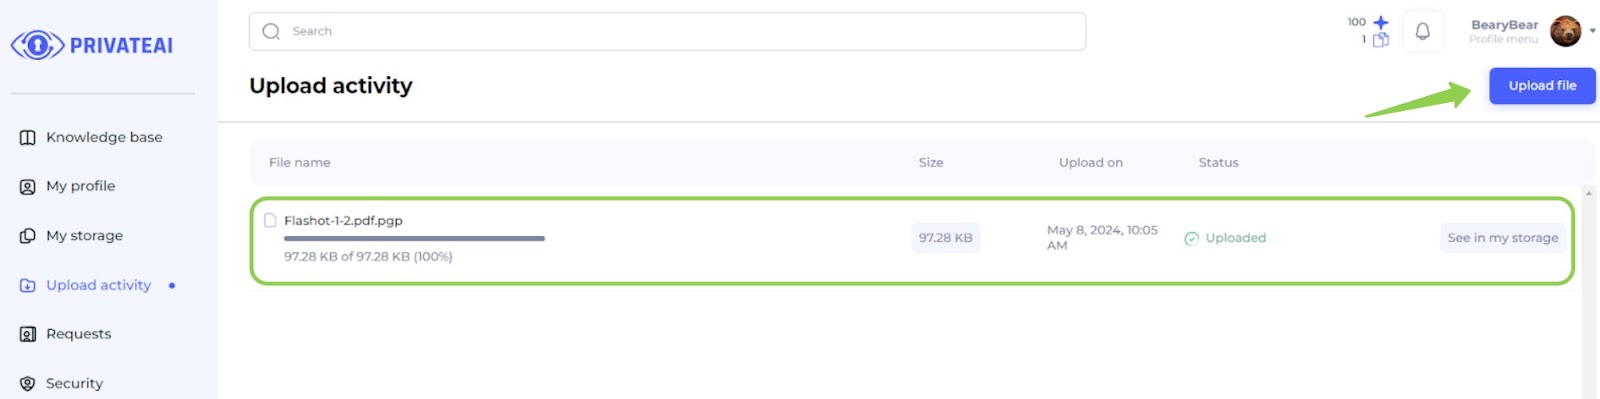
- Wallet Linked:
- Once the wallet is linked to the account, the user can proceed to upload files to the platform.
- Navigate to Upload Activity Page:
- Go to the "Upload activity" page.
- Upload a File:
- Click on the “Upload file” button.
- Select a file from the local directory.
- Once the file is selected, it will begin uploading.
- Monitor Upload Progress:
- The user can see the upload progress displayed on the screen.
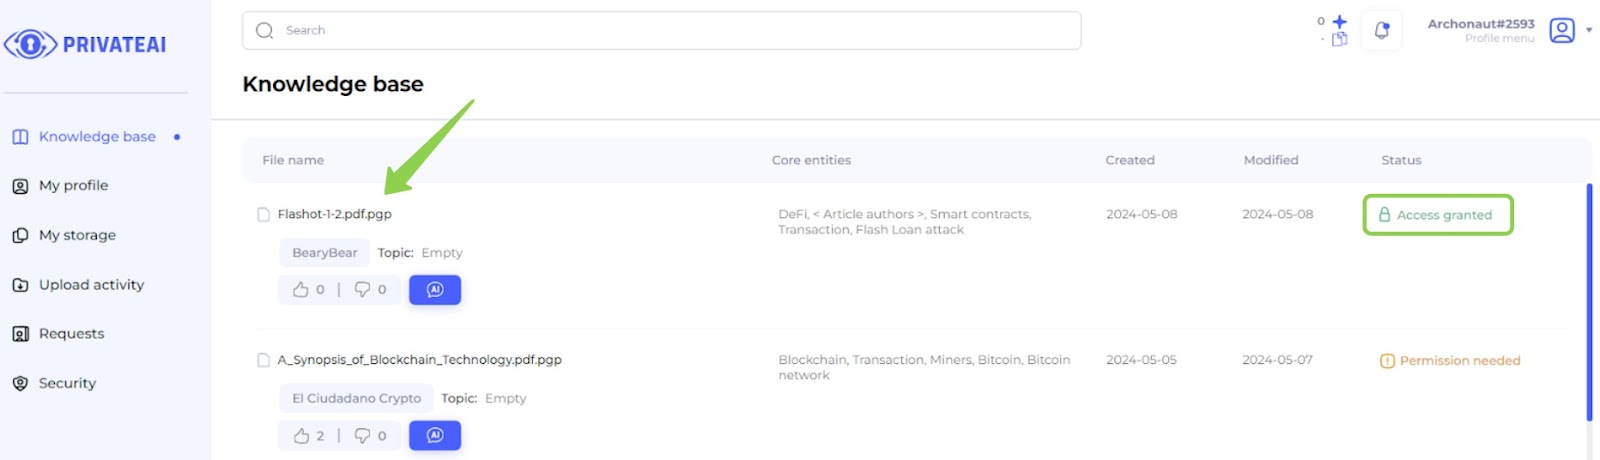
4. Knowledge base (Data searcher)

- Search for Files:
- After the data owner uploads a file, a data searcher can search for this file on the “Knowledge base” page.
- Demonstration of Search:
- For demonstration, log in to another account (e.g., Archonaut#2593) to verify the file's availability.
- Ensure the file is the same by checking its name and author.
- Permission Needed:
- Notice that the file has a “Permission needed” status, indicating that access must be requested before downloading.
- Requesting Access:
- Click on the file name to navigate to the file page.
- From the file page, the data searcher can request access to the file.
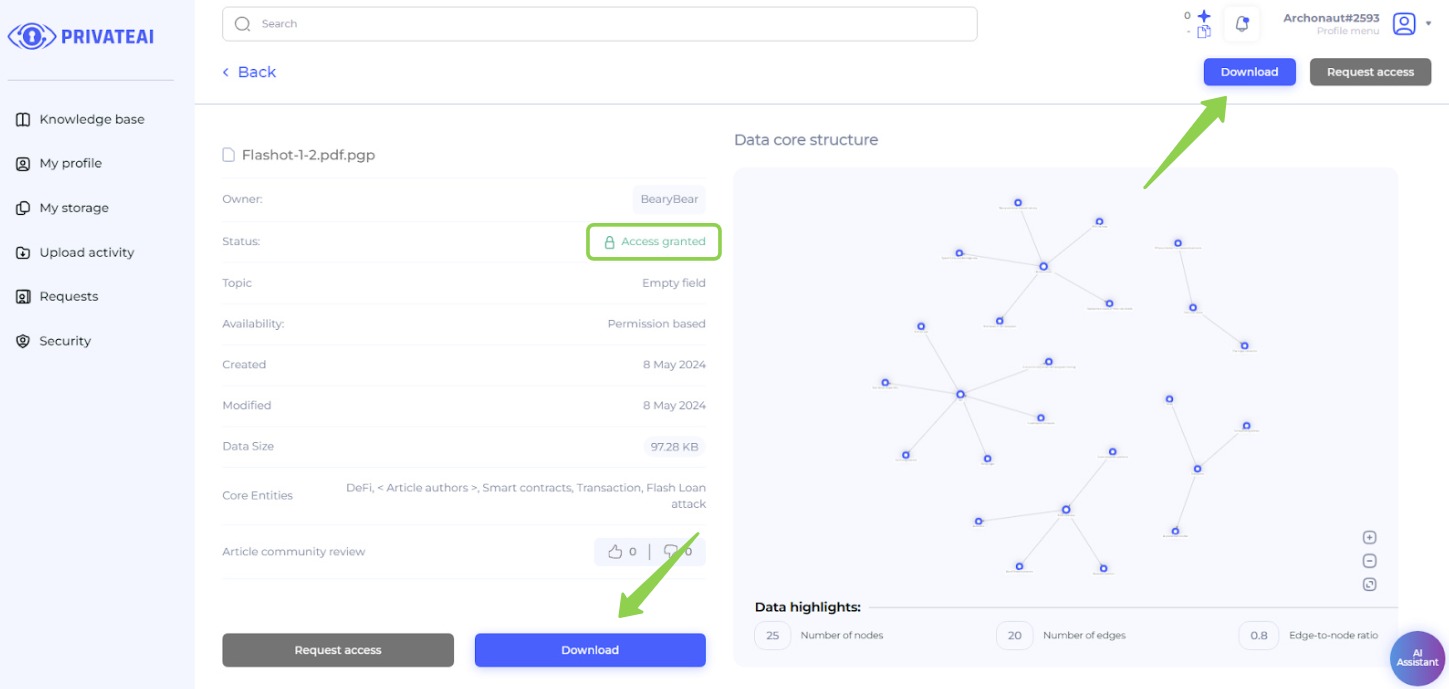
5. File page (Data searcher)
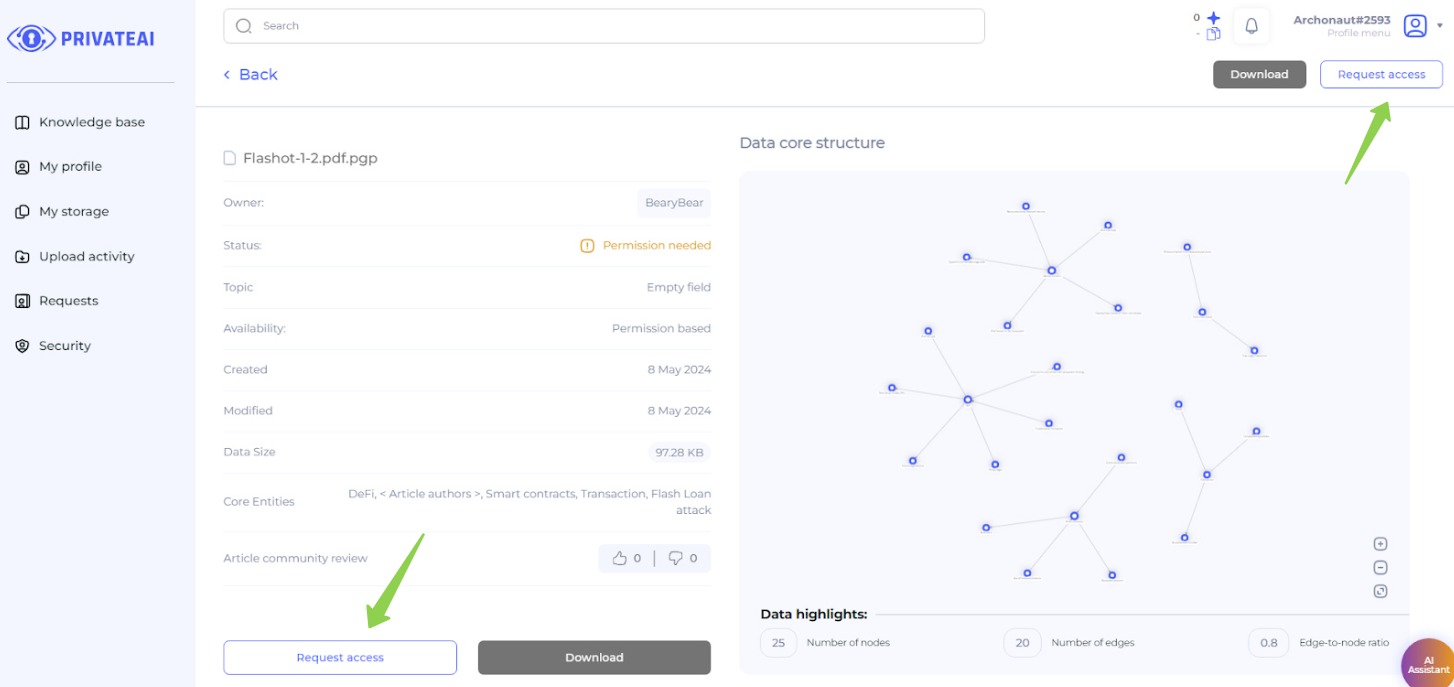
- View File Details:
- On the file page, a data searcher can view various details about the selected file.
- Inactive Download Buttons:
- The “Download” buttons are inactive because the user does not yet have permission to access the file.
- Requesting Access:
- The data searcher can request access to the file by clicking on either of the highlighted buttons (e.g., “Request read-only access” or “Request full access”).
6. Request confirmation (Data searcher)
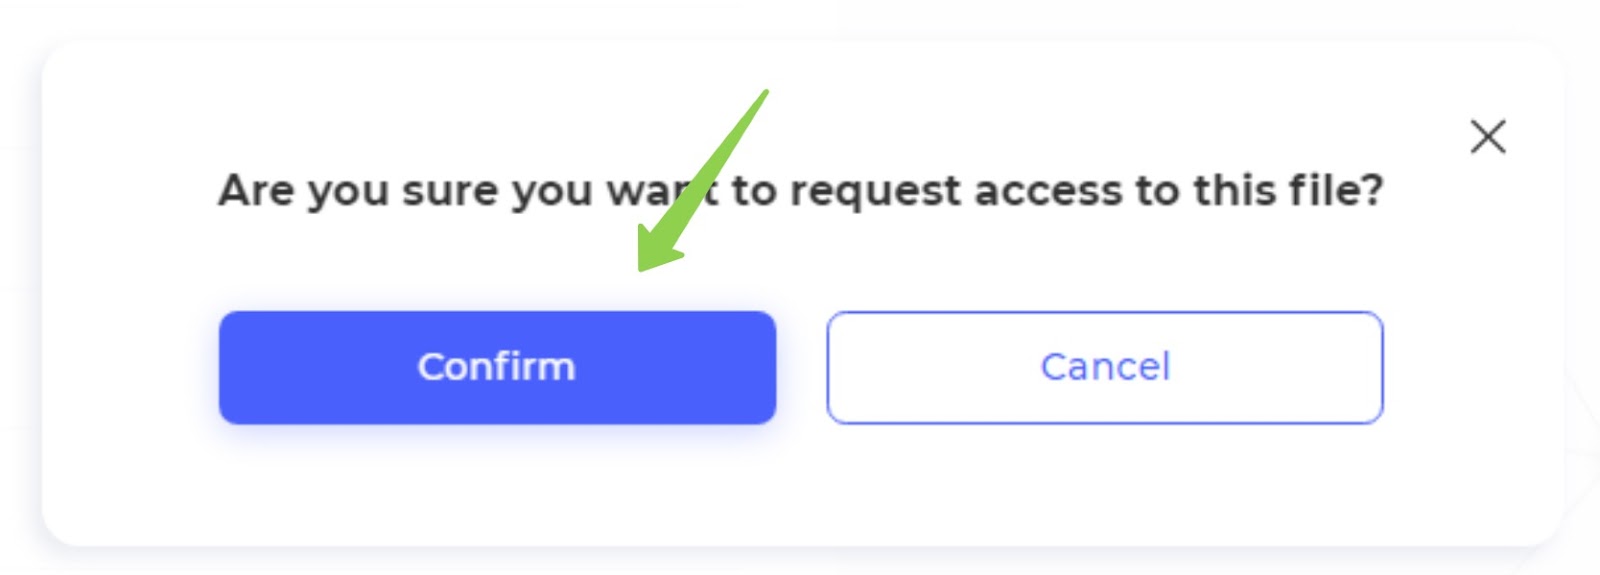
- Confirm Request:
- After clicking the access request button, the data searcher should confirm their request in the additional modal window that appears.
- This step ensures that the request is intentional and allows the user to proceed with the access request.
7. Access requests (File owner)
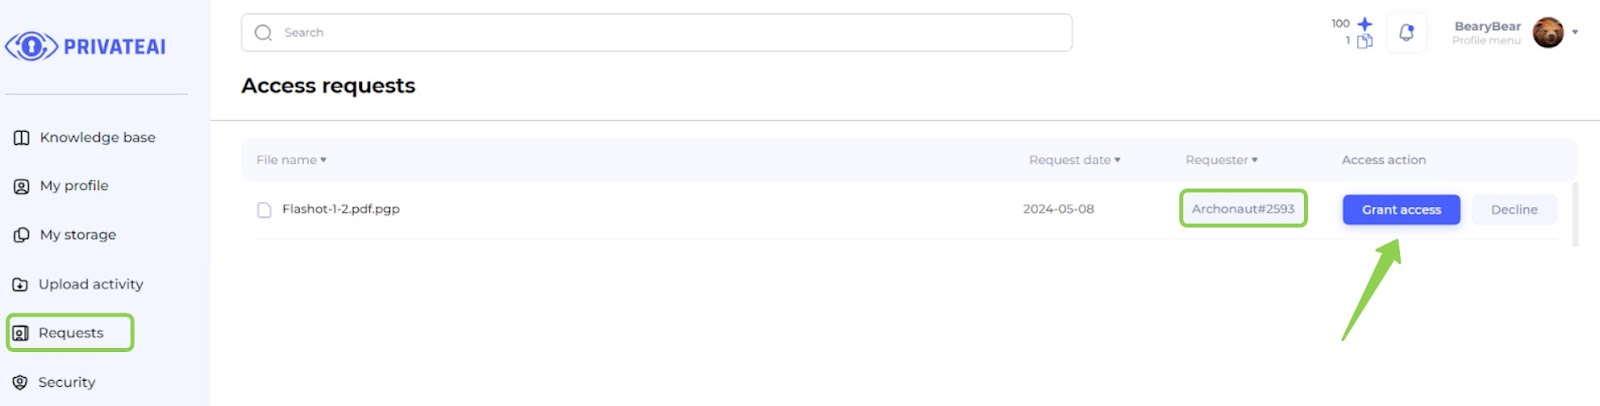
- Log in to Data Owner Account:
- Switch back to the data owner account.
- Navigate to Requests Page:
- Go to the "Requests" page.
- View New Request:
- On the "Requests" page, observe the new request from the data searcher (second account).
- Grant Access:
- Grant access to the file by clicking on the corresponding button next to the request.
8. Metamask verification (File owner)
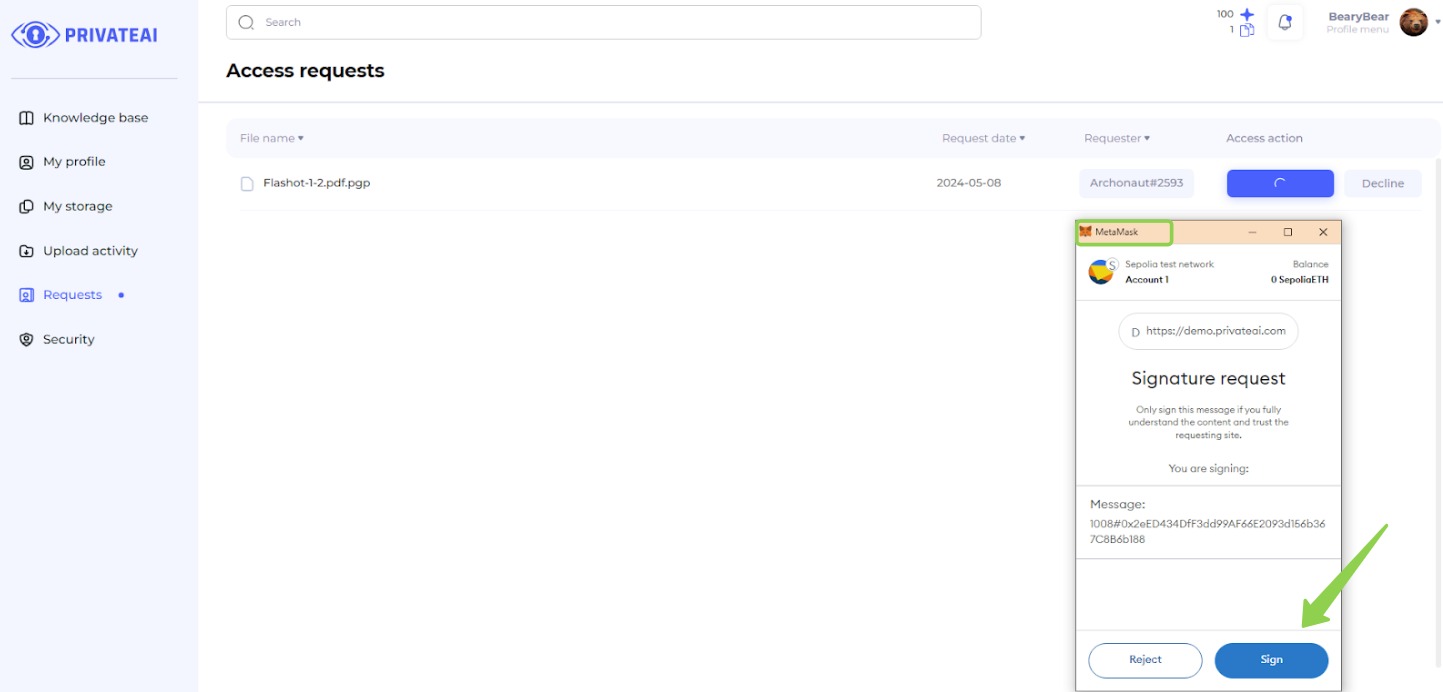
- Sign the Message:
- After granting access, the data owner is prompted to sign a message in the MetaMask extension.
- This step verifies the identity of the data owner and confirms the access permission.
- Completion:
- Once the message is signed, the data searcher will be granted access to the file.
9. Access granted (Data searcher)
- Log in to Data Searcher Account:
- Switch back to the data searcher account.
- Check Access Status:
- Confirm that access has been granted by verifying the notification or status update.
- Navigate to File Page:
- Return to the file page where the previously requested file is located.
- Access File:
- With access granted, the data searcher should now see active download buttons and be able to proceed with downloading or viewing the file as permitted.
10. Download possibility (Data searcher)
- Active Download Button:
- On the file page, the "Download" button is now active, indicating that access has been granted.
- Download the File:
- Click the "Download" button to begin downloading the file.
11. Metamask verification (Data searcher)
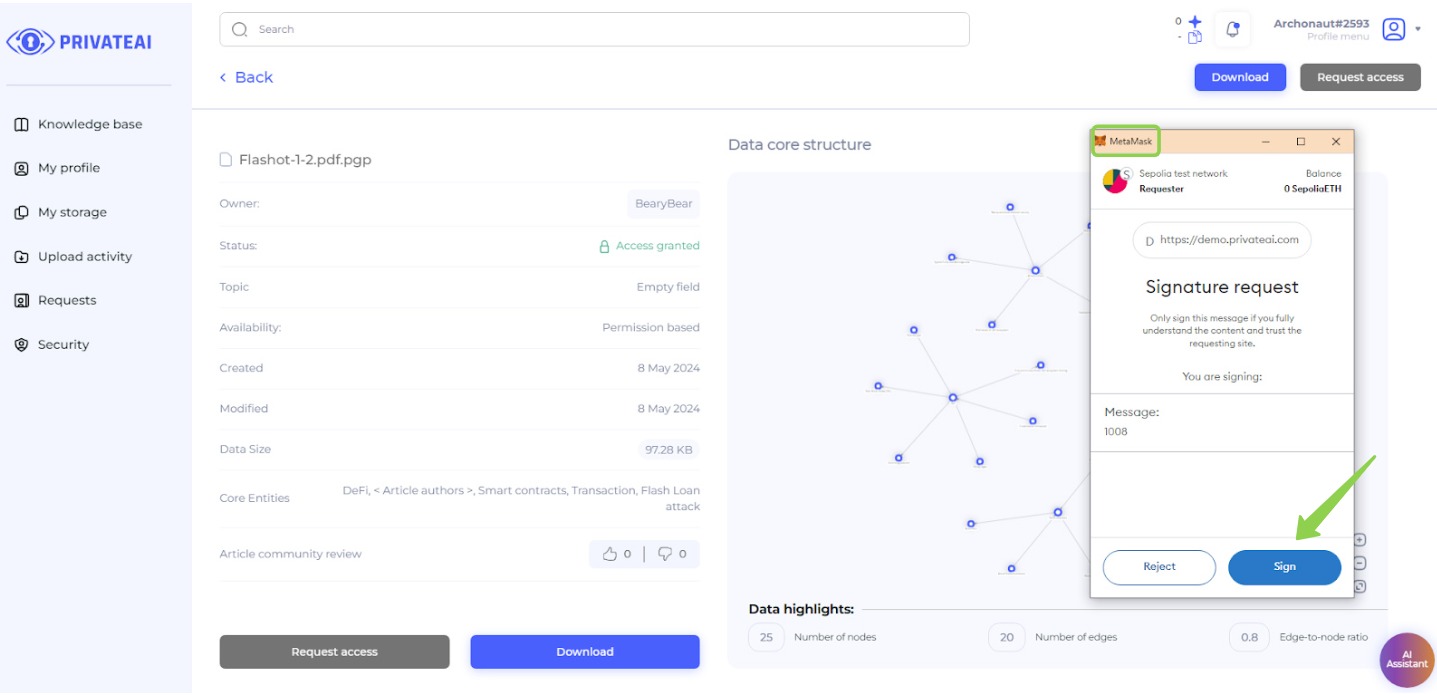
- Sign Message for Verification:
- Before the download starts, the data searcher will be prompted to sign a message in the MetaMask wallet to verify their identity.
- Provide Signature:
- Sign the message using the MetaMask wallet extension.
- Download the File:
- Once the signature is verified, the file download will commence.
By following these steps, the data searcher successfully gains access and downloads the file after receiving permission from the data owner.